Friday, October 25, 2013

Erg Chair: Day 2

We started off today planning to make more detailed diagrams and list the parts we needed in order of importance so that we could order them. Then we looked back at the pictures of the fixed erg seat that CRI already has...and we compared it to the pictures advertising the device...

These are the original pictures of the device at Community Rowing:


This is the picture from the product page:

As you can see, the product picture shows the moving seat still attached to the erg, with the fixed seat over it.  The attachment device (clamps) are also reversed from how Community Rowing has it installed. If they reversed their attachment, the adjustment screws would be on the bottom, which would potentially make it much easier to adjust... So our problem might already be solved...

Tuesday, October 22, 2013

Erg Chair: The 1st Official Day


    Amy and I started on our project for Community Rowing, which is to improve the fixed seats that they have for the adaptive rowers with limited lower body movement.
 
   So, we started out the day by going through the giant pile of brainstormed ideas that we generated during the last class. We then decided to focus on ways to fix the seat to the erg itself securely, while still making it easier to adjust in the horizontal direction.

   We started out looking at draw latches and tension latches (like the ones on jam jars) and the kind of pin locks that they use in weightlifting machines.

But first, we took a physics break and looked at the forces acting on the seat. (I even drew a very bad free body diagram!)

Then, Professor Banzaert directed us to the hardware website McMaster-Carr, where we found this gem:
Inline image 1
Anyway, after we recovered from this little dose of awesome, we finally found what we were looking for (sort of...): 
Inline image 1 
Eventually we decided that this might not be the best pin to use, so at this point we just know that we are going to be using a quick-release pin.

For adjusting the seat, we considered using a Telescoping Round-Hole Strut Channel

Then we realized that we would need to attach the channel and the tube to the chair and the erg itself, so that whole idea was out...

So we actually used our brains (whoa) and then we figured out a design that might work... It ended up basically being a combination of the ideas we brainstormed in the first place, we just took a long time to develop them.

Monday, October 7, 2013

CRI Adaptive Rowing Project Post #1

Our class beginning to work with our community partner, Community Rowing, Inc. This first post is basically just me exploring adaptive rowing.

Adaptive Rowing Technologies: 
  • FrontRower Rowing System: This is a system of pulleys and gears that allows the rower to row the boat with just their hands, just their feet, or their hands and feet together. The problem is that this system rows the boat forward, while we want the shell to row backwards, so we would need to reverse the system in order for it to be used in adaptive rowing. 
  • Fixed Seats: These are seats that do not slide like those in traditional boats, but are fixed in place so that rowers with limited leg mobility (AS-Arms and Shoulders, or TA-Trunk and Arms) maintain better balance. The rowers are strapped into these seats to prevent trunk movement, which makes capsizing much more dangerous.
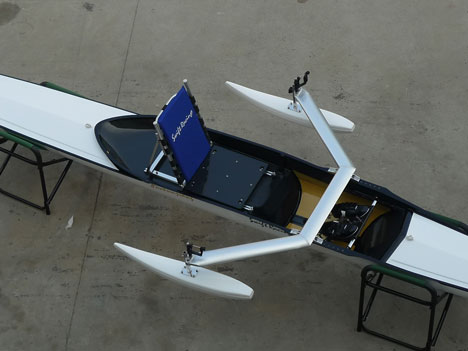
  • Pontoons: Stabilizing pontoons are attached to the riggers to help balance for rowers who cannot use their full lower bodies to stabilize the boat.
Project Ideas That I Am Most Interested In Pursuing:
  • Improving the dock in terms of wheelchair access while still maintaining the integrity of the dock 
    • Original Issue: "The lower dock floats and when the water is low, the angle is too steep for wheelchairs.  A secondary ramp has been installed, but is narrow, near the edge of the dock, and is damaging the wood at the intersection" (Amy Banzaert)
  • Figuring out how rowers can become more independent in moving their rowing equipment
    •  Original Issue: "Rowers currently need assistance bringing oars, pontoons, life jackets, and boats to the dock." (Amy Banzaert)
  • Designing or improving adaptive devices for one-handing rowing
    • Original Issue: "Adaptive devices for one-handed erging are of interest. They have been developed previously but there may be further opportunity." (Amy Banzaert)
  • Improving boat balance for rowers with limited mobility, especially amputees
    • Original Issue: "Balance is a challenge generally for rowers with limited mobility and particularly difficult for amputees with a center of mass off of the body's centerline.  Any solution would ideally be something the rower could carry and install him/herself." (Amy Banzaert)
Questions for CRI Coaches/Staff/Adaptive Rowers:
  • What kinds of disabilities can you currently accommodate?
  • Do you provide rowing opportunities for visually impaired people? If yes, how does that work?
  • How do you accommodate people with back problems that prohibit them from leaning forward?
  • Do you do team adaptive rowing or just individual adaptive rowing?
  • How do you currently compensate for people with centers of mass that are not directly down their bodies (amputees, people with muscular atrophy in just one limb, people with one limb a different length from the other, etc.)? 
  • How do you think the adaptive rowing process could be improved?
Sources:
  • http://www.dezeen.com/2012/08/31/paralympic-design-adaptive-rowing-equipment/
  • http://sites.temple.edu/mariakalishchentsovprofessionaltrpsychrt/2013/02/18/adaptive-rowing-video-using-the-front-rower-rowing-system-for-adapt-sport-recreation-leis-ser-sec001-class/
  • http://www.frontrower.com/

"Being Wrong:" The Intersections of Wrongness and Product Creation

     The lessons learned from the book "Being Wrong" by Kathryn Shultz can be applied in many ways to the process of product creation. This book masterfully illustrates why product creation must include and even embrace being wrong, and yet how we as humans and as a society are not psychologically inclined towards purposefully being wrong, admitting our wrongness, or even correcting ourselves in the face of our wrongness. 
     Our whole approach to being wrong is contingent upon the oft-reinforced belief that error is shameful, something to hide or deny at all costs, because "it feels safe and pleasurable to be steadfast in our convictions" (p. 173). But this philosophy of sorts does not work at all when it comes to product creation. 
     The phrase "fail early to achieve success faster" basically sums up how scientists, especially engineers, must approach problems. This is because we know that, because it is impossible to create the perfect product, products must fail often in order to succeed. But this fact is very difficult for many people to accept, even subconsciously, because our whole society and psychological wiring is working against us. Especially because "we are usually much more willing to entertain the possibility that we are wrong about insignificant matters than about weighty ones" (p. 13). Unfortunately, a "failed" product is often perceived as a weighty matter - something that we have put so much time and energy into cannot just be wrong.
     So, basically, in order to design a good product, we must ignore everything we think about being wrong, ignore our subconscious mind, and make a conscious effort to embrace failure as a crucial step in the process of product creation... That should be easy, right?

Tuesday, October 1, 2013

Small-Scale Prototyping: Strap-On Rollerskates

Ever wish you could roller skate to class and then not have to carry around those giant stakes afterward? Well now you can! With these beauties that Amy and I designed and built:
The Minion Skate
Yes, they are still kinda large, but that is only because our materials and building expertise were limited. The idea itself was sound! And they have minions on them...

Note: Yes, we know that strap-on roller skates already exist. We did not, however, realize this when we started designing them, so lets just pretend that they are a new idea.

THE PROCESS
    It all started one day when we were walking back to our dorms from engineering class. We randomly brainstorming and sharing ideas (because we are nerds), when we finally thought of the best idea ever: a whole line of skates, skis, and snowshoes that you could strap over your shoes as you traveled speedily to class.
    By an amazing coincidence, the next week our assignment in engineering class was to design and build a prototype of something. We immediately decided to put our idea into practice, and we chose to create the strap-on roller skates that eventually became the Minion Skates.
    Our original sketch:
Original Sketch
Me drawing the original sketch
    We changed a lot of things between the original plan and the actual finished product. Especially our materials. We changed our materials about 400 times.

Original Materials:
 Base plate Wood
 Foot plate Blue styrofoam 
 Ankle support Blue styrofoam
 Straps Velcro
 Wheels Thick wood
 Axles Metal dowels
 Wheel structure  Wood
 Wheel structure
 - base plate
 - foot plate
 connections
 Metal screws


These are basically the only materials that stayed the same.

We were having a lot of problems with designing our heel support so that the 3D printer would print it out. 

But luckily Professor Banzaert saved the day and figured out how to make the model:


Another problem: Amy was too short to see in the 3D printer... But we figured it out...


And the heel pieces came out beautifully... After we forgot to print out the second heel support. Luckily, Amy was in the lab 5 hours early, so the piece was already printed by the time I got there...

Then we decided to laser cut the wheels out of sheets of plastic.
Materials:
 Base plate Wood
 Foot plate Blue styrofoam 
 Ankle support Blue styrofoam  3D-printed 
 Straps Velcro
 Wheels Thick wood Plastic layers
 Axles Metal dowels
 Wheel structure  Wood
 Wheel structure
 - base plate
 - foot plate
 connections
 Metal screws


After a few tires, we found the right size hole to fit the dowel that we were using as the wheel axle.

Then we tried cutting the metal dowels.... It didn't go well... So we switched to plastic...

We were going to use these stoppers to hold the dowels in place:

But when we put them into the holes in the wooden sides, we discovered that they were already held in by tension.
We were also going to epoxy the plastic wheel sheets to each other, but the epoxy didn't like that idea, so we just let them be loose. And it still moves, so I count it as a success.

We were also going to screw the wooden plates and the foam together.


But that didn't work out because we realized that we could just hot glue it together. We were making a looks-like model, not a works-like model, so the skates didn't have to be weight-bearing.


We then added the velcro, which had an adhesive side.


And they were beautiful, albeit with much different materials than we had planned!

Final Materials:
 Base plate Wood
 Foot plate Blue styrofoam 
 Ankle support Blue styrofoam  3D-printed 
 Straps Velcro
 Wheels Thick wood Plastic layers
 Axles Metal dowels Plastic dowels 
 Wheel structure  Wood
 Wheel structure
 - base plate
 - foot plate
 connections
 Metal screws Different metal
screws
 Hot glue

Then we decorated them and the Minion Skate was born.